The Joy of Deploying Apache Storm on Docker Swarm

This is a guest repost from Baqend Tech on deploying and redeploying an Apache Storm cluster on top of Docker Swarm instead of deploying on VMs. It's an interesting topic because of the experience Wolfram Wingerath called it "a real joy", which is not a phrase you hear often in tech. Curious, I asked what made using containers such a good experience over using VMs? Here's his reply:
When I wrote the lines you were quoting in your email, I had a situation in the back of my head that had occurred a few months back when I had to set up and operate an Apache Storm cluster with 16+ nodes. There were several issues such as my inexperience with AWS (coming from OpenStack) and strange connectivity problems relating to Netty (used by Storm) and AWS hostname resolution that had not occurred in my OpenStack setup and eventually cost us several days and several hundred bucks to fix. I really think that you can shield from problems like that by using Docker, simply because your environment remains the same: Docker.
On to the tutorial...
For our upcoming query caching and continuous query features of Baqend Cloud, we rely on Apache Storm for low-latency data processing. Several projects have dedicated themselves to enabling multi-server Storm deployments on top of Docker (e.g. wurstmeister/storm-docker or viki-org/storm-docker), but scaling beyond server-limits always seems to make things complicated. Since scalability and ease-of-operation is key for our deployment, we have adopted Docker Swarm from the beginning and are very happy with how smoothly everything is humming along. With this tutorial, we’d like to share our experiences, raise your interest in the Baqend Real-Time API we’ll be releasing soon and ultimately increase the hype for Docker Swarm (because it is just awesome!) :-)
If you are new to Swarm, have a look at our AWS Meetup Docker slides!
What We Are Going to Do
Outline
We will start by describing the tutorial deployment and explain how everything will be working together. After that, we’ll provide the minimal set of instructions required to set everything up in the TL;DR section (using some bash scripts we prepared) and then get to the meat and bones of this tutorial and walk you through the entire ordeal of deploying a Docker Swarm cluster and a multi-node Apache Storm cluster on top step-by-step. We will also cover routine tasks, both related to Storm (in particular deploying and killing a topology from a remote server) and Swarm (e.g. restarting the manager node and killing the entire Storm cluster).
Overview: Deployment
The illustration below shows the architecture of the deployment:
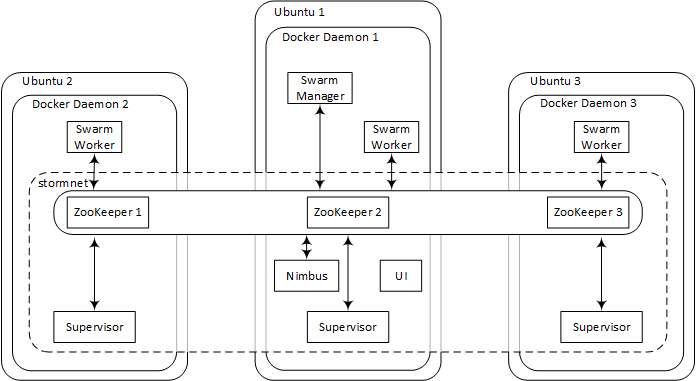
You’ll have 3 machines running Ubuntu Server 14.04, each of which will be running a Docker daemon with several containers inside. After the initial setup, you will only talk to one of the machines, though, (Ubuntu 1) and it will for the most part feel like having a single Docker daemon.
When Swarm is in place, you’ll create an overlay network (stormnet) to enable communication between Docker containers hosted on the different Swarm nodes. Finally, you will set up a full-fledged Storm cluster that uses the existing ZooKeeper ensemble for coordination and stormnet for inter-node communication. While the supervisor containers will be distributed with a one-per-server strategy, the Nimbus and UI containers will be spawned on the manager node (Ubuntu 1).
Public access to the Ubuntu 1 machine is required (i.e. assign a public IP and open port 8080!); without it, you won’t be able to have a look at the beautiful Storm UI ;-)
Step-By-Step Guide
We are using hostnames zk1.cloud, zk2.cloud and zk3.cloud for the three Ubuntu machines. Since the the ZooKeeper servers and the manager node are two different roles conceptually, we are also using manager.swarm and manager.swarm.baqend.com for the private and public IP address of the manager node; even though Ubuntu 1 plays the role of ZooKeeper 1 and the manager in this tutorial, you can have two different servers in your deployment for these two. Just check out the tutorial on GitHub, find-and-replace our hostnames with your hostnames in the readme.me and you should be able to copy-paste most of the statements into the shell as we go along.
TL;DR
For those among you who prefer some quick results, we prepared some scripts for you! They are all you need to deploy Swarm and Storm. However, for the sake of comprehensibility, we also provide a detailed step-by-step walk-through directly afterwards.
So before we go through everything in detail, here are the fast-forward instructions:
Create a Ubuntu 14.04 server – let’s call it Ubuntu 1 – and connect to it via SSH. Then, execute the following to checkout the tutorial scripts and install Docker:
sudo apt-get install git -y && \
cd /home/ubuntu/ && \
git clone https://github.com/Baqend/tutorial-swarm-storm.git && \
chmod +x tutorial-swarm-storm/scripts/* && \
cd tutorial-swarm-storm/scripts/ && \
sudo bash installDocker.sh && \
sudo usermod -aG docker ubuntu && \
sudo shutdown -h now
- The machine will automatically power down. When it has shut down, take a snapshot.
Launch two machines (Ubuntu 2 and Ubuntu 3) from the image you just took, using the following customisation script to make them Swarm worker nodes:
#!/bin/bash
cd /home/ubuntu/ && rm -rf tutorial-swarm-storm && \
git clone https://github.com/Baqend/tutorial-swarm-storm.git && \
cd tutorial-swarm-storm/scripts/ && \
chmod +x ./* && \
./init.sh zk1.cloud,zk2.cloud,zk3.cloud
Note: You’ll have to replace the hostnames in the comma-separated list above with your own.
- Set up the DNS in such a way that the first hostname in the list (
zk1.cloud) points towardsUbuntu 1and the others point towards the other two machines. Also make sure thatmanager.swarm.baqend.comandmanager.swarmare resolved to the public and private IP addresses ofUbuntu 1, respectively. - Make sure the machines can talk to one another: Ports
2181,2888,3888(ZooKeeper),2375(Docker Swarm) and6627(Storm, remote topology deployment) are required.manager.swarm.baqend.com:8080has to be accessible from the outside for the Storm UI.
Finally, start Ubuntu 1 and execute the following to set up the ZooKeeper ensemble, Swarm and Storm:
cd /home/ubuntu/tutorial-swarm-storm/scripts/ && \
ZOOKEEPER=zk1.cloud,zk2.cloud,zk3.cloud && \
sudo bash init.sh $ZOOKEEPER manager && \
. swarm.sh $ZOOKEEPER && \
. storm.sh $ZOOKEEPER 3
Note: Again, remember replacing the hostnames with your own.
You should now be able to access the Storm UI under http://manager.swarm.baqend.com:8080!
Furthermore, when you type in
docker info
on the manager node, you should see that the UI and the Nimbus containers are running on the same machine as the Swarm manager and that the supervisor containers are all running on different machines.
Let’s Do It Again: Prepare an Image
Okay, let’s go through the individual steps one after the other now. In order to make this entire procedure not too repetitive, you’ll do the preparation steps on only one of the machines, shut it down and take a snapshot (image). You will then create the other machines from this snapshot.
So let’s begin:
Create Ubuntu 1 as a Ubuntu 14.04 server. Connect to it via SSH and install Docker by executing the following:
sudo apt-get update && sudo apt-get install apt-transport-https ca-certificates && sudo apt-key adv --keyserver hkp://p80.pool.sks-keyservers.net:80 --recv-keys 58118E89F3A912897C070ADBF76221572C52609D \
&& echo "deb https://apt.dockerproject.org/repo ubuntu-trusty main" | sudo tee -a /etc/apt/sources.list.d/docker.list \
&& sudo apt-get update && sudo apt-get purge lxc-docker && sudo apt-cache policy docker-engine \
&& sudo apt-get update -y && sudo  apt-get install -y linux-image-extra-$(uname -r) apparmor docker-engine git make \
&& sudo usermod -aG docker $(whoami)
(Details on how to install Docker can be found here.)
Since Docker uses a key file to identify individual docker daemons, you now have to stop the docker daemon, delete the key file (Docker will generate a new one after restart) and shut down the machine before taking the snapshot:
sudo service docker stop \
&& sudo rm /etc/docker/key.json
Note: If you don’t remove the key file before taking the snapshot, all machines spawned from this image will have the same identifier and you’ll end up with a broken Swarm cluster.
The only thing left to do is to prepare the machine in such a way that it will become a Swarm worker the next time it boots. To this end, create file /etc/init.sh with an editor like nano
sudo nano /etc/init.sh
and then paste the following and save:
#!/bin/bash
# first script argument: the servers in the ZooKeeper ensemble:
ZOOKEEPER_SERVERS=$1

# second script argument: the role of this node:
# ("manager" for the Swarm manager node; leave empty else)
ROLE=$2

# the IP address of this machine:
PRIVATE_IP=$(/sbin/ifconfig eth0 | grep 'inet addr:' | cut -d: -f2 | awk '{ print $1}')

# define label for the manager node:
if [[ $ROLE == "manager" ]];then LABELS="--label server=manager";else LABELS;fi
# define default options for Docker Swarm:
echo "DOCKER_OPTS=\"-H tcp://0.0.0.0:2375 \
    -H unix:///var/run/docker.sock \
    --cluster-advertise eth0:2375 \
    $LABELS \
    --cluster-store \
    zk://$ZOOKEEPER_SERVERS\"" \
| sudo tee /etc/default/docker

# restart the service to apply new options:
sudo service docker restart

echo "let's wait a little..."
sleep 30

# make this machine join the Docker Swarm cluster:
docker run -d --restart=always swarm join --advertise=$PRIVATE_IP:2375 zk://$ZOOKEEPER_SERVERS
It is now time to shut down the machine
sudo shutdown -h now
and take a snapshot of it.
Now launch two more machines (Ubuntu 2 and Ubuntu 3) from the snapshot image, providing the following as an init/customisation script:
#!/bin/bash
/bin/bash /etc/init.sh \
    zk1.cloud,zk2.cloud,zk3.cloud
Note: If you are using OpenStack, you can provide the script as customisation script. In AWS, it is called user data.
Restart the machine you have taken the snapshot of (Ubuntu 1), connect to it and execute the following:
/bin/bash /etc/init.sh \
    zk1.cloud,zk2.cloud,zk3.cloud \
    manager
This will set up a Swarm worker on this machine and will also label it as the Swarm manager.
- Now set up your DNS in such a way that the first hostname in the list (
zk1...) points towards the manager onUbuntu 1and the other two hostnames (zk2...andzk3...) point towards the other two machines you just started, i.e.Ubuntu 2andUbuntu 3. Also havemanager.swarm.baqend.comandmanager.swarmresolved to the public and private IP addresses ofUbuntu 1, respectively. - Finally, configure your security settings to allow connections between the machines on ports
2181,2888,3888(ZooKeeper),2375(Docker Swarm) and6627(Storm, remote topology deployment). If you want to visit the Storm UI from the outside, you’ll also have to makemanager.swarm.baqend.com:8080open to the world.
Time to get to the interesting stuff!
Create the Swarm Cluster
If nothing has gone wrong, you should now have three Ubuntu servers, each running a Docker daemon. Ubuntu 1 should be reachable via zk1.cloud and manager.swarm in your private network and via manager.swarm.baqend.com from the outside (at least on port 8080). This is the machine you have worked on so far and it is going to be the only machine you will talk to from this point on. In order to enable coordination among the Swarm nodes, you still have to setup the ZooKeeper ensemble and the Swarm manager:
Connect to Ubuntu 1 via SSH and perform a quick health check. If Docker is installed correctly, the following will show a list of the running Docker containers (exactly 1 for Swarm and nothing else):
docker ps
You are now good to launch one ZooKeeper node on every machine like this:
docker -H tcp://zk1.cloud:2375 run -d --restart=always \
      -p 2181:2181 \
      -p 2888:2888 \
      -p 3888:3888 \
      -v /var/lib/zookeeper:/var/lib/zookeeper \
      -v /var/log/zookeeper:/var/log/zookeeper  \
      --name zk1 \
      baqend/zookeeper zk1.cloud,zk2.cloud,zk3.cloud 1
docker -H tcp://zk2.cloud:2375 run -d --restart=always \
      -p 2181:2181 \
      -p 2888:2888 \
      -p 3888:3888 \
      -v /var/lib/zookeeper:/var/lib/zookeeper \
      -v /var/log/zookeeper:/var/log/zookeeper  \
      --name zk2 \
      baqend/zookeeper zk1.cloud,zk2.cloud,zk3.cloud 2
docker -H tcp://zk3.cloud:2375 run -d --restart=always \
      -p 2181:2181 \
      -p 2888:2888 \
      -p 3888:3888 \
      -v /var/lib/zookeeper:/var/lib/zookeeper \
      -v /var/log/zookeeper:/var/log/zookeeper  \
      --name zk3 \
      baqend/zookeeper zk1.cloud,zk2.cloud,zk3.cloud 3
By specifying the -H ... argument, we are able to launch the ZooKeeper containers on the different host machines. The -p commands expose the ports required by ZooKeeper per default. The two -v commands provide persistence in case of container failure by mapping the directories the ZooKeeper container uses to the corresponding host directories. The comma-separated list of hostnames tells ZooKeeper what servers are in the ensemble. This is the same for every node in the ensemble. The only variable is the ZooKeeper ID (second argument), because it is unique for every container.
To check ZooKeeper health, you can do the following:
docker -H tcp://zk1.cloud:2375 exec -it zk1 bin/zkServer.sh status && \
docker -H tcp://zk2.cloud:2375 exec -it zk2 bin/zkServer.sh status && \
docker -H tcp://zk3.cloud:2375 exec -it zk3 bin/zkServer.sh status
If your cluster is healthy, every node will report whether it is the leader or one of the followers.
Now it’s time to start the Swarm manager:
docker run -d --restart=always \
      --label role=manager \
      -p 2376:2375 \
      swarm manage zk://zk1.cloud,zk2.cloud,zk3.cloud
Now the Swarm cluster is running. However, we still have to tell the Docker client about it. So finally, you only have to make sure that all future docker run statements are directed to the Swarm manager container (which will do the scheduling) and not against the local Docker daemon:
cat << EOF | tee -a ~/.bash_profile
    # this node is the master and therefore should be able to talk to the Swarm cluster:
    export DOCKER_HOST=tcp://127.0.0.1:2376
EOF
export DOCKER_HOST=tcp://127.0.0.1:2376
This will do it for the current session and also make sure it will be done again when we log into the machine next time.
Health Check
Now everything should be up and running. Type in
docker info
to check cluster status on the manager node. You should see 3 running workers similar to this:
    Nodes: 3
     docker1: zk1.cloud:2375
      └ Status: Healthy
      └ Containers: 3
      └ Reserved CPUs: 0 / 1
      └ Reserved Memory: 0 B / 2.053 GiB
      └ Labels: executiondriver=native-0.2, kernelversion=3.13.0-40-generic, operatingsystem=Ubuntu 14.04.1 LTS, server=manager, storagedriver=devicemapper
      └ Error: (none)
      └ UpdatedAt: 2016-04-03T15:39:59Z
     docker2: zk2.cloud:2375
      └ Status: Healthy
      └ Containers: 2
      └ Reserved CPUs: 0 / 1
      └ Reserved Memory: 0 B / 2.053 GiB
      └ Labels: executiondriver=native-0.2, kernelversion=3.13.0-40-generic, operatingsystem=Ubuntu 14.04.1 LTS, storagedriver=devicemapper
      └ Error: (none)
      └ UpdatedAt: 2016-04-03T15:39:45Z
     docker3: zk3.cloud:2375
      └ Status: Healthy
      └ Containers: 2
      └ Reserved CPUs: 0 / 1
      └ Reserved Memory: 0 B / 2.053 GiB
      └ Labels: executiondriver=native-0.2, kernelversion=3.13.0-40-generic, operatingsystem=Ubuntu 14.04.1 LTS, storagedriver=devicemapper
      └ Error: (none)
      └ UpdatedAt: 2016-04-03T15:40:15Z
The important part is the line with Status: Healthy for each node. If you observe something like Status: Pending or if not all nodes show up, even though you are not experiencing any errors elsewhere, try restarting the manager container like so
docker restart $(docker ps -a --no-trunc --filter "label=role=manager" | awk '{if(NR>1)print $1;}')
and check again. (This may cause an error message; ignore it.)
Setup the Storm Cluster
Now that Swarm is running, you will create an overlay network that spans all Swarm nodes and then spin up several containers for the individual Storm components. The Nimbus and the UI will be hosted on the manager node, whereas the supervisors (i.e. Storm workers) will be scattered across all nodes in the Swarm cluster, one per server.
First, create the overlay network stormnet like this
docker network create --driver overlay stormnet
and check whether stormnet shows up as overlay network when you ask Docker nicely:
docker network ls
Now you will start every Storm component one-by-one. Every Storm-related container will get a cluster=storm label, so that you will be able to easily kill the entire Storm cluster later without accidentally killing other containers.
First, start the UI
docker run \
    -d \
    --label cluster=storm \
    --label role=ui \
    -e constraint:server==manager \
    -e STORM_ZOOKEEPER_SERVERS=zk1.cloud,zk2.cloud,zk3.cloud \
    --net stormnet \
    --restart=always \
    --name ui \
    -p 8080:8080 \
    baqend/storm ui \
      -c nimbus.host=nimbus
and the Nimbus:
docker run \
    -d \
    --label cluster=storm \
    --label role=nimbus \
    -e constraint:server==manager \
    -e STORM_ZOOKEEPER_SERVERS=zk1.cloud,zk2.cloud,zk3.cloud \
    --net stormnet \
    --restart=always \
    --name nimbus \
    -p 6627:6627 \
    baqend/storm nimbus \
      -c nimbus.host=nimbus
To make sure that these are running on the manager node, we specified a constraint: constraint:server==manager.
- You can now access the Storm UI as though it would be running on the manager node: Given your manager node has a public IP and is open on port
8080, you can check your Storm cluster using a web browser underhttp://manager.swarm.baqend.com:8080. However, there are no supervisors running, yet.
To start 3 supervisors, fire the following statement 3 times:
docker run \
    -d \
    --label cluster=storm \
    --label role=supervisor \
    -e affinity:role!=supervisor \
    -e STORM_ZOOKEEPER_SERVERS=zk1.cloud,zk2.cloud,zk3.cloud \
    --net stormnet \
    --restart=always \
    baqend/storm supervisor \
     -c nimbus.host=nimbus \
     -c supervisor.slots.ports=[6700,6701,6702,6703]
Since we do not care where exactly the individual supervisors are running, we did not specify any constraints or container names here. However, in order to prevent two supervisors from being hosted on one machine, we did specify a label affinity: affinity:role!=supervisor. If you need more supervisor containers, you’ll have to add additional Swarm worker nodes (Ubuntu 4, Ubuntu 5, …).
- Have a look at the Storm UI and make sure that you have three supervisors running.
(Remote) Topology Deployment
Deploying a topology can now be done from any server that has a Docker daemon running and is in the same network as the manager machine. The following command assumes that your topology fatjar is a file called topology.jar in your current working directory:
docker -H tcp://127.0.0.1:2375 run \
   -it \
   --rm \
   -v $(readlink -m topology.jar):/topology.jar \
   baqend/storm \
     -c nimbus.host=manager.swarm \
     jar /topology.jar \
       main.class \
       topologyArgument1 \
       topologyArgument2
Note: This command will spawn a Docker container, deploy the topology and then remove the container. You should provide the -H tcp://127.0.0.1:2375 argument to make sure the container is started on the machine you are currently working on; if you left the scheduling to Docker Swarm, the deployment might fail because the spawning host does not necessarily have the topology file.
By the way, we use readlink -m topology.jar which produces an absolute path for topology.jar, because relative paths are not supported. You can also provide an absolute path directly, though.
Killing a Topology
Killing the topology can either be done via the Storm web UI interactively or, assuming the running topology is called runningTopology, like this:
docker run \
   -it \
   --rm \
   baqend/storm \
     -c nimbus.host=manager.swarm \
     kill runningTopology
The host argument -H ... is not required here, because the statement stands on its own and has no file dependencies.
Shutting Down the Storm Cluster
Since every Storm-related container is labelled with cluster=storm, you can kill all of them with the following statement:
docker rm -f $(docker ps -a --no-trunc --filter "label=cluster=storm" | awk '{if(NR>1)print $1;}')
Don’t Forget About Security!
In this tutorial, we demonstrated how to get a distributed Storm cluster up and running on top of Docker with a multi-node ZooKeeper ensemble for high availability and fault-tolerance. In order to prevent the complexity of this tutorial from going through the roof, though, we stepped over how to configure Docker Swarm for TLS. If you are planning to use Docker Swarm in a business-critical application, you should definitely put some effort into this aspect of deployment!
How Is Baqend Using Apache Storm?
We are harnessing Storm’s power to provide low-latency streaming queries and query caching:
Continuous Queries
If the continuous query feature is enabled for your app, our Apache Storm cluster receives both your continuous queries and all your write operations and cross-matches them: Every time an object is written, all registered continuous queries are matched against it. Since Storm is keeping track of all the query result sets, it can detect both new matches and new mismatches and notify you of any change as soon as it happens.
Query Caching
For query caching, we use these notifications for proactive cache invalidation: Baqend Cloud caches a query result with a reasonable TTL and proactively invalidates a cached query result as soon as a change is registered. Since our Storm-empowered matching pipeline imposes a latency overhead of only a few milliseconds, you get your data significantly faster within tight staleness bounds.
Both features are going to be available in Baqend Cloud soon and we will publish more specifics on the architecture and benchmarking results in the near future on the Baqend Tech Blog, so stay tuned!
Closing Remarks
We created the tutorial for Docker version 1.10.3 and Swarm version 1.1.3 and tested it both on OpenStack and AWS. The tutorial itself as well as our Storm and ZooKeeper Docker images are available under the very permissive Chicken Dance License v0.2:
- tutorial at GitHub
- baqend/storm Docker image at Docker Hub and GitHub
- baqend/zookeeper Docker image at Docker Hub and GitHub
Please feel free to fork us on GitHub or file a pull request if you have any improvements!
We hope you enjoyed this tutorial and leave us some feedback in the comments section below!