Master-Master Replication and Scaling of an Application between Each of the IoT Devices and the Cloud
In this article, I want to share with you how I solved a very interesting problem of synchronizing data between IoT devices and a cloud application.
I’ll start by outlining the general idea and the goals of my project. Then I’ll describe my implementation in greater detail. This is going to be a more technically advanced part, where I’ll be talking about the Contiki OS, databases, protocols and the like. In the end, I’ll summarize the technologies I used to implement the whole system.
Project overview
So, let’s talk about the general idea first.
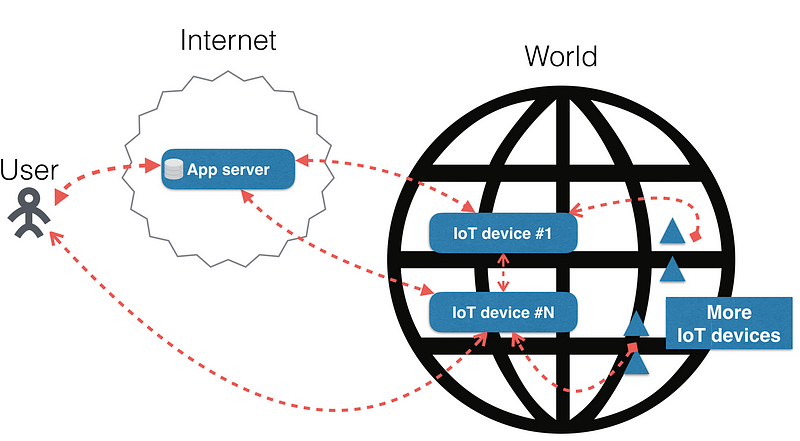
Here’s a scheme illustrating the final state of the whole system:
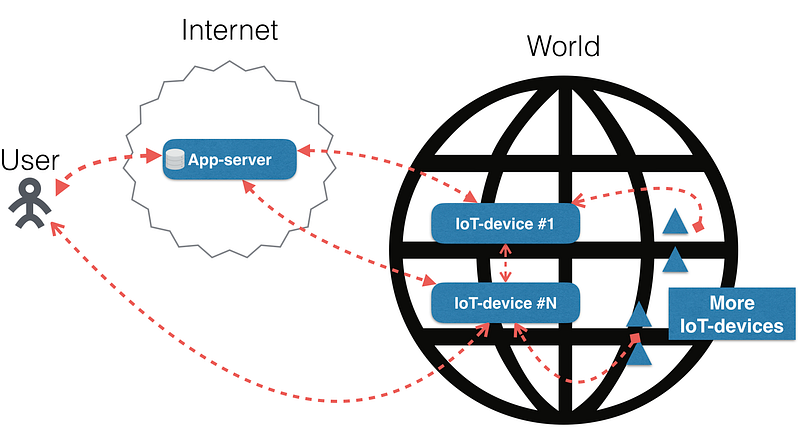
I have a user who can connect to IoT devices via a cloud service or directly (that is over Wi-Fi).
Also, I have an application server somewhere in the cloud and the cloud itself somewhere on the Internet. This cloud can be anything — for example, an AWS or Azure instance or it could be a dedicated server, it could be anything :)
The application server is connected to IoT devices over some protocol. I need this connection to exchange data between the application server and the IoT devices.
The IoT devices are connected to each other in some way (say, over Ethernet or Wi-Fi).
Also, I have more IoT devices generating some telemetry data, like light or temperature readings. There can be more than 100 and even over 1,000 devices.
Basically, my goal was to make it possible to exchange data between the cloud and these IoT devices.
Before I proceed, let me outline some requirements for my system:
- It should synchronize data among the IoT devices.
- It should be gathering data from the IoT devices.
- It should synchronize data between the IoT devices and the cloud.
Implementation
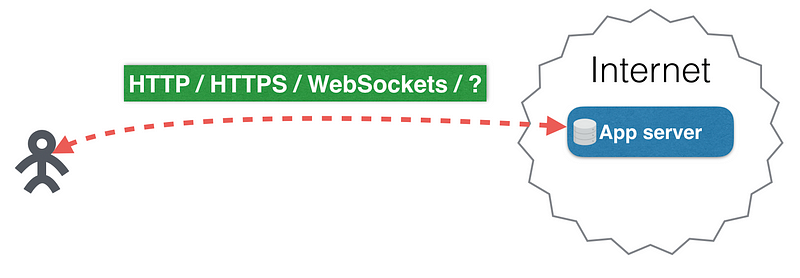
It’s pretty straightforward: the user connects to the application server over HTTP(S) or WebSocket or a similar protocol.
Okay, here’s a little quiz for you. What do you think can be used to connect the application server to an IoT device?

If you thought of MQTT, you are definitely right! As are those who chose HTTP(S). In fact, it may be any protocol! Just pick one and be done with it.
And — drum roll — my choice is asynchronous replication! I’m talking about the usual replication that databases have.

You might be wondering how replication can help me. Well, basically, replication exists for synchronizing data. So, I can maintain the same database on all devices, including the cloud and IoT devices.
Replication is difficult to implement, though. If you want to have replication, you need to have a database that supports it. Because replication is a natural feature of databases.
Here, I’d like to say a few words about the databases I considered for this project: SQLite, Redis, MySQL, PostgreSQL and Tarantool.
I compared their characteristics and tried running some of them — except for MySQL and PostgreSQL — directly on an IoT device, and would like to share the results I got.
SQLite is definitely a good choice for storing data directly on an IoT device, but it doesn’t have replication and doesn’t really support concurrent access for different processes.
Redis doesn’t support master-master replication, so it won’t solve my problem since I need two-way replication.
MySQL and PostgreSQL are too heavy for an IoT device. I didn’t even try to install them. But if you decide to give MySQL or PostgreSQL a try, feel free to share your experience in the comments below.
The last database on my list was Tarantool. In fact, I’m a committer to the Tarantool project, so I know the people who develop it. Definitely, this was a good choice for me, because I know this project well. And of course, Tarantool has master-master replication. You could also try something else with it. My main point here is that IoT devices can leverage real databases with master-master replication for data transfer.
But we’ve only scratched the surface so far, so let’s now dive deeper into the implementation.
I’ll start with the problems I had with Tarantool.
First of all, Tarantool wouldn’t work on the ARMv7 architecture. To make things worse, Tarantool wouldn’t run in a 32-bit environment (only 64-bit).
I managed to solve these problems, and I want to share my development rules that helped me get this done:
- Use toolchain files for CMake.
Otherwise, you’ll waste a lot of time patching your CMake files, like I did. - Don’t use unsigned and other types with unspecified sizes.
libc has special types for that, like uint32_t. Otherwise, you’ll get undefined behavior. This rule applies only to C/C++ code. - Port your auto-tests.
You should expect that your auto-tests can be executed on an IoT device. Otherwise, you’ll spend a lot of time fixing bugs.
Okay, I have a working database with master-master replication. So far so good! My next step is to connect devices running this database over 6LoWPAN.
Recall that I have a lot of interconnected IoT devices in a 6LoWPAN network. And I need to gather all telemetry data from them.
Here’s a brief visual explanation of how this whole setup works
Devices with sensors transfer telemetry data via radio waves. This standard is called 6LoWPAN, which is an acronym for IPv6 over low-power wireless personal area networks.
I’d like to point out that I didn’t use LoRaWAN. I might use it in future, though. In this article, I’ll be focusing on 6LoWPAN alone.
So, telemetry data is collected by a gateway, which is an important part of the system. A gateway is a MIPS device — to refresh your memory, MIPS is a processor family — that has a WAN antenna for gathering data transmitted over radio waves. Also, a gateway has 6LBR software installed that helps convert data received over radio waves to IPv6 packets.
6LBR application
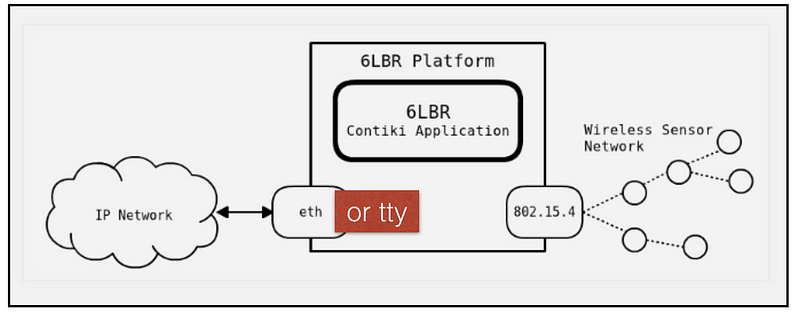
The image above illustrates the workflow of 6LBR. The gateway with 6LBR software installed is a converter between a wireless sensor network and anything else.
The reason this image shows conversion from a wireless sensor network to an IP network is because it’s the default behavior of 6LBR. I’ll explain how to change this behavior further down the road.
For more information, check this link to the 6LBR GitHub page.
You might ask, “What exactly does 6LBR do for me?”
First, it gives me an IP stack, so I can use all the features of the TCP and UDP stacks inside my 6LBR applications.
Second, I can use any I/O devices with 6LBR. Say, I could write raw data directly to bash =)
Unfortunately, 6LBR can’t write directly to MQTT. MQTT brokers don’t know anything about raw data. Sad, but true!
But why would I need to write directly to an MQTT broker in the first place? The answer is legacy.
I’d like to say a few words about 6LBR applications here.
Generally, a 6LBR application is C code with the 6LBR API that allows using an IP stack and doing other things as well. Developing such an application is associated with at least two major difficulties: complex thread model and complex memory model. That said, if you want to create a 6LBR application, you must be ready for a lot of segfaults.
Here’s a snippet of my 6LBR application (sorry, I can give only a screenshot with obfuscated code, the true sources are closed):

Notice one interesting thing here — PROCESS_YIELD(). 6LBR has cooperative multitasking, which means 6LBR applications have to yield, and they do so for each loop iteration. The code should not run for too long.
Let’s review where we stand with the project right now.
A 6LBR gateway enabled me to create a mesh network, so I could read and write data to it. Also, I was able to wrap IP packets into MQTT messages, each containing information about the device, including telemetry data. Moreover, I had the ability to manipulate I/O devices. For instance, I was able to write MQTT messages to UART. But then I faced a new problem: Tarantool doesn’t work with MQTT brokers.
Here’s how I got around this issue.
I decided to use libmosquitto, an MQTT library written in plain C, as a simple and portable way to integrate MQTT into my application.
The snippet below shows how to use this library to handle MQTT messages(link):
I can take a reference to a socket file handle and use my own event loop for handling some events. Great, right?
I’d like to draw your attention to the fact that Tarantool also has cooperative multitasking, same as 6LBR. For yields, Tarantool uses coio_wait().
Oh, I forgot to mention Tarantool is a Lua application server. Surprise!
So, I ported libmosquitto for using this code in Lua.
Below is an example where I call the function that you saw in the previous snippet:
Also, I ported all functions from the libmosquitto API. You can check this port here. Here is an example of how it’s used.
To get data from all devices inside a mesh network, I need to call the subscribe() function from a specific location and publish the get() method. That’s all it takes to communicate with devices within a mesh network!
Wrap-up
Let’s now take a look at the resulting setup:

The application server is connected via Tarantool’s master-master replication. This gives me two features:
- When the application server changes any dataset, those changes are delivered to all IoT devices in the network.
- When an IoT device changes any dataset, those changes are delivered to the application server.
These two features are the solution to my problems.
Also, I can connect my IoT devices via master-master replication. This ties them and the cloud into a cluster that allows me to synchronize all datasets. All IoT devices and the cloud are in sync most of the time, except for when a connection is down. But once it is back up, they’re quickly synced again. Isn’t that cool!
The 6LBR gateway allows exchanging datasets between my IoT devices and other IoT devices. It wraps each message into an MQTT message and passes them into a UART channel.
IoT device #N, which has an MQTT broker installed, reads those messages from the UART channel. The MQTT broker redirects the messages to Tarantool over an MQTT connection. Tarantool reads them — and then Tarantool’s application server executes some code for each message.
IoT device #N is connected to all other devices via Tarantool’s master-master replication. The cloud and each IoT device are connected via Tarantool’s master-master replication as well.
Well, that wraps it up! I’ve managed to solve that issue, and I really hope that my experience helps you in the future. Just to reiterate, I was using Tarantool both as the main frontend on my dedicated servers and as an application server. If you’re interested and want to know more, check this article.